Zbyněk Šlajchrt
Tuesday, April 26, 2011
TOMAN - Simple Transfer Object Manager
Thursday, October 7, 2010
SOA vs. OOP – Jing a Jang v architektuře podnikových aplikací
Standardní odpověď aplikačního architekta na otázku zákazníka, jak by navrhl architekturu zamýšlené podnikové aplikace, bude pravděpodobně znít: „Použiji klasickou třívrstvou architekturu.“ Počet vrstev se může samozřejmě případ od případu lišit, faktem však zůstává, že se podobné odpovědi staly v posledních letech tak trochu klišé. Architektonická rozhodnutí jsou do značné míry předurčena etablovanými technologickými platformami, které aplikačnímu architektovi vymezují manipulační prostor pro rozhodování. Mezi nejpoužívanější platformy pro vývoj podnikových aplikací patří v současnosti bezesporu dvě rivalské technologie Microsoft .NET a Java EE[1]. Architekt obvykle nemá možnost volby mezi zmíněnými platformami a je často postaven před hotové rozhodnutí, učiněné s ohledem na obchodní a strategické zájmy dodavatele či zákazníka. Nicméně společným jmenovatelem obou vedoucích technologií je skutečnost, že byly navrženy s důrazem na usnadnění tvorby vícevrstvých, distribuovaných aplikací. Obě platformy poskytují pestrou škálu různých knihoven, API a nástrojů, které významně zefektivňují vývoj. Nezbytnou podmínkou je samozřejmě jejich zvládnutí vývojářem a dostatečná praxe.
Připomeňme si hlavní přednosti vícevrstvé architektury. Je-li správně a racionálně navržena, může mít pozitivní vliv hned na několik systémových kvalit. Asi nejdůležitější kvalitou je škálovatelnost. Tato vlastnost určuje, jak je aplikace schopna vypořádat se s rostoucími nároky, například zvyšujícím se počtem současně přistupujících uživatelů. Rozdělení aplikace do slabě svázaných vrstev umožňuje řešit problematiku úzkého hrdla aplikace na úrovni jednotlivých vrstev. Nejvíce zatíženou vrstvu lze po identifikaci vyčlenit a patřičně posílit. (Obecně platí, že prezentační vrstva se obvykle škáluje přidáváním dalších počítačů, zatímco perzistentní vrstva se škáluje navyšováním paměti a počtu procesorů.)
Vícevrstvá architektura úzce souvisí s architekturou orientovanou na služby (SOA). SOA aplikace jsou obvykle distribuované, vícevrstvé aplikace, které mají prezentační, aplikační a perzistentní vrstvu. Veškerá funkcionalita takové aplikace je vystavena prostřednictvím služeb. V SOA aplikacích se typicky neudržuje stav konverzace s klientem, komunikace probíhá způsobem dotaz-odpověď, případně jednosměrně, komponenty aplikace jsou slabě provázané a primárním zájmem je business logika aplikace poskytovaná formou služeb.
Zajímavým postřehem je, že v uvedených architektonických přístupech jaksi nezbývá místo pro objektové paradigma (OOP), tolik populární před nástupem SOA. Koneckonců, jak .NET tak Java jsou objektové jazyky, jejichž „objektovost“ zde přichází poněkud vniveč. Tyto jazyky mají vestavěné objektové koncepty jako dědičnost, polymorfismus a zapouzdření, které dávají architektům a vývojářů do rukou mocné nástroje při objektovém návrhu aplikací. V servisně orientovaných aplikacích je primárním artefaktem služba, tedy procedurální prvek, který zpracovává či poskytuje data. Data a business logika jsou zde oddělené. Návrhové vzory považované za „best-practicies“ v servisně orientovaném návrhu jsou v objektově orientovaném návrhu často považované za anti-vzory a naopak. Jistě stojí za úvahu, zda-li jsme se spontánním přechodem k servisně orientované architektuře nevědomky neochudili o nějaký důležitý či užitečný koncept ze světa objektového návrhu.
Pro ilustraci uvádím příklad webové aplikace pro ukládání a úpravu fotografií. Uvažujme případ užití, ve kterém si uživatel zobrazí vybranou fotografii. Na stránce s fotkou má k dispozici kontrolky, pomocí kterých může měnit různé vlastnosti a parametry fotky, například rozměr.
Aplikace navržená v intencích SOA paradigmatu bude poskytovat služby pro vyhledání fotografií, pro jejich úpravu, uložení atp. Fotka samotná bude reprezentovaná prostou datovou strukturou bez metod (tzv. anemický objekt). Pokud si uživatel přeje provést nějaké úpravy, aplikace zavolá odpovídající službu, které předá objekt fotografie. Služba vrátí upravený objekt a prezentační vrstva jej zobrazí uživateli. Pokud je uživatel s úpravami spokojen, uloží změny prostřednictvím služby pro ukládání fotografií. Objekt fotografie je po většinu času tzv. odpojený, neboli bez spojení na databázi. Výhody s tím spojené mohou být snadno převáženy komplikovaným a výkonnostně náročným slučováním pozměněného objektu se stávající verzí v databázi během ukládání. Tento problém je obzvlášť citelný v případě rozměrných objektů, jako například právě fotografií.
Podívejme se nyní na stejnou aplikaci, tentokrát navrženou v objektovém paradigmatu. Na rozdíl od servisně orientované architektury, kde je primárním artefaktem služba, zde je v centru pozornosti objekt fotografie. Ten neobsahuje pouze prostá data, ale současně s sebou nese také operace pro manipulace s daty (zapouzdření). Požadavek na přeformátování fotografie se nepředává specializované službě, nýbrž se o přeformátování požádá samotný objekt fotografie. Takový design je velmi intuitivní a přirozený, neboť vystihuje naše vrozené vnímání objektů z okolního světa coby autonomní entity. Významným rozdílem je také skutečnost, že objekt je po celou dobu tzv. připojený, neboli v kontaktu s perzistentní vrstvou. Nedochází zde tudíž k onomu komplikovanému a náročnému slučování verzí. Objektový návrh se také elegantněji vypořádává s požadavkem na odlišné zpracování požadavku v závislosti podle typu objektu (polymorfismus). Lze si představit, že změna rozměrů nějaké speciální fotografie, např. fotky do pasu, bude na rozdíl od obyčejné fotografie provádět jakési dodatečné kontroly na povolené rozměry. Využitím dědičnosti (jejíž podpora je součástí programovacího jazyka) lze tohoto chování snadno docílit. V servisně orientovaném návrhu vede řešení takového požadavku k složitému a předpotopnímu řešení pomocí větvení kódu.
Je potěšující, že poslední verze platformy Java EE přinesla řadu nových technologií a vylepšení (obvykle inspirovaných v open-source projektech – např. Seam a Guice), která návrh objektově orientované architektury podnikových aplikací významně usnadňují. Díky nim může nyní architekt navrhovat podle potřeby oba typy architektur v rámci jedné platformy. Závěrem bych rád podtrhl, že ačkoliv jsou oba přístupy v mnoha ohledech antagonistické, mohou nejen koexistovat v jedné aplikaci, ale mohou se i vhodně a účelně doplňovat.
[1] Další technologie postavené na Javě používané při vývoji podnikových aplikací, jako například Spring a Seam, považuji za produkty vzniklé v důsledku nedokonalostí a omezení starších verzí platformy Java EE. Je pravděpodobné, že současný trend nastavený platformou Java EE 5/6, která převzala řadu inovací a nápadů ze zmíněných technologií, povede k jejich postupnému opouštění.
Sunday, October 3, 2010
Konfigurace českého prostředí v BlueJ na Mac OS X
1. Rozbalte si archiv s lokalizací BlueJ stažený ze stránek p. Pecinovského (http://vyuka.pecinovsky.cz/bluej_config/index.html)
2. Rozbalte obsah aplikace BlueJ ve Finderu poklepáním pravým tlačítkem myši na její ikonu a volbou Show Package Contents
3. Přejděte do složky Contents/Resources/Java a nakopírujte do ní obsah archivu s lokalizací
4. Vraťte se do složky Contents, kde poklepejte na soubor Info.plist
5. V editoru vyberte složku Root/Java/Properties
6. Tlačítkem New Child přidejte novou systémovou vlastnost JVM file.encoding s hodnotou UTF-8
7. Uložte změny a spusťte BlueJ
Poslední úpravy lze provádět i manuálně v obyčejném textovém editoru. Soubor Info.plist je "obyčejné" XML.
Saturday, October 2, 2010
Nastavení TCP/IP portů využívaných serverem Glassfish v3
V základní konfiguraci využívá Glassfish tři porty: 4848, 8080 a 8181. Na portu 4848 běží administrátorská konzole, porty 8080 a 8181 jsou určeny pro webové aplikace, přičemž port 8080 slouží ke komunikaci prostřednictvím HTTP protokolu, port 8181 se používá pro HTTPS protokol.
V případě konfliktu s existujícími aplikacemi v systému, které již používají zmíněné porty, často nezbývá jiná možnost, než změnit čísla portů používaných Glassfishem. Nejjednodušší způsob, jak nastavit tato čísla, je ruční zásah do XML souboru v útrobách instalace serveru.
Nastavení je třeba provést v souboru, který se nachází na cestě [glassfish_path]\glassfish\domains\domain1\config\domain.xml, kde [glassfish_path]
<network-listeners>
<network-listener port="8093" ... />
<network-listener port="8181" ... />
<network-listener port="4848" ... />
</network-listeners>
Úpravy v NetBeans
Provedené změny se bohužel nepromítnou do prostředí NetBeans. Proto je třeba vytvořit nový server Glassfish 3 a asociovat jej s vyvíjenou aplikací.
Návod:
1. Přepněte do záložky Services
2. Klikněte pravým tlačítkem na položkou Servers a zvolte Add Server...
3. Vyberte Glassfish Server 3 a klikněte na Next
4. Lokalizujte adresář s instalací serveru na vašem počítači. Nachází se v adresáři s instalací NetBeans. Klikněte na Next
5. Klikněte na Finish
Nyní je třeba asociovat vyvíjenou aplikaci s nově vytvořeným serverem:
1. Přepněte do záložky Projects
2. Klikněte pravým tlačítkem nad uzlem projektu a zvolte Properties (poslední položka)
3. Vyberte položku Run a na pravé horní straně panelu vyberte název nově vytvořeného serveru.
Saturday, April 17, 2010
JPA: persisting vs. merging entites
Persisting entities
In contrast to the merge method the persist method is pretty straightforward and intuitive. The most common scenario of the persist method's usage can be summed up as follows:
"A newly created instance of the entity class is passed to the persist method. After this method returns, the entity is managed and planned for insertion into the database. It may happen at or before the transaction commits or when the flush method is called. If the entity references another entity through a relationship marked with the PERSIST cascade strategy this procedure is applied to it also."
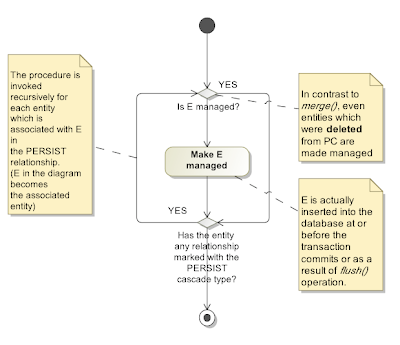
The specification goes more into details, however, remembering them is not crucial as these details cover more or less exotic situations only.
Note: If the entity has been removed from the persistence context then it becomes managed again when passed to the persist method. If the entity is detached (i.e. it was already managed) then an exception may be thrown.
Merging entities
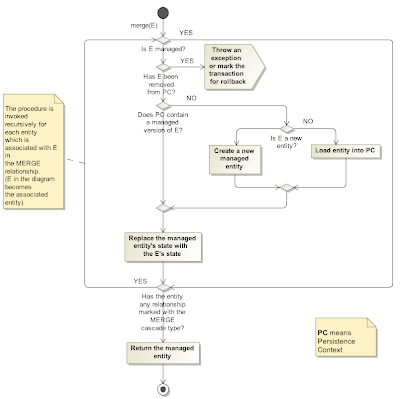
In comparison to persist, the description of the merge's behavior is not so simple. There is no main scenario, as it is in the case of persist, and a programmer must remember all scenarios in order to write a correct code. It seems to me that the JPA designers wanted to have some method whose primary concern would be handling detached entities (as the opposite to the persist method that deals with newly created entities primarily.) The merge method's major task is to transfer the state from an unmanaged entity (passed as the argument) to its managed counterpart within the persistence context. This task, however, divides further into several scenarios which worsen the intelligibility of the overall method's behavior.
Instead of repeating paragraphs from the JPA specification I have prepared a flow diagram that schematically depicts the behaviour of the merge method:
Comparison
- persist deals with new entities (passing a detached entity may end up with an exception.)
- merge deals with both new and detached entities
- persist always causes INSERT SQL operation is executed (i.e. an exception may be thrown if the entity has already been inserted and thus the primary key violation happens.)
- merge causes either INSERT or UPDATE operation according to the sub-scenario (on the one hand it is more robust, on the other hand this robustness needn't be required.)
or flush is called
- persist makes a previously removed entity managed again
- merge throws an exception if a previously removed entity is passed
- persist makes the passed entity managed
- merge copies the state of the passed entity to the managed entity
- persist does not return any value
- merge returns the managed entity - the clone of the passed entity
- both methods ignore a managed entity and turn their attention to the entities referenced through PERSIST, resp. MERGE, relationships
- In contrast to merge, passing a detached entity to persist may lead to throwing an exception.
So, when should I use persist and when merge?
persist
- You want the method always creates a new entity and never updates an entity. Otherwise, the method throws an exception as a consequence of primary key uniqueness violation.
- Batch processes, handling entities in a stateful manner (see Gateway pattern)
- Performance optimization
- You want the method either inserts or updates an entity in the database.
- You want to handle entities in a stateless manner (data transfer objects in services)
- You want to insert a new entity that may have a reference to another entity that may but may not be created yet (relationship must be marked MERGE). For example, inserting a new photo with a reference to either a new or a preexisting album.
Design flaws
The persist method implements inserting a new entity. The merge method implements both inserting and updating. There is apparently one method missing, which would implement updating without inserting. I can go on in generalization and think about possibility to define a custom behavior that occurs when an entity is being combined with the persistence context. From this point persisting, merging and updating would be mere three strategies how to combine an incoming entity with the content of the persistence context. The EntityManager interface would contain one general method, let's call it combine(entity, strategy), that would take two arguments: the entity and the strategy used for combining the entity with the persistence context. The strategy would be an interface having two main implementations: PersistStategy and MergeStrategy which would comply with the persist, resp. merge method. In this design both methods would simply delegate their invocations to the combine method passing the corresponding strategy instance.
The concept of cascade policies could be also generalized: instead of using the values from the CascadeType enumeration a programmer would use the class of the strategy itself as a value for the strategy attribute (or other) of the relationship annotations.
Instead:
@OneToOne(cascade=CascadeType.PERSIST)the code would look like this:
public Address getAddress() {
return address;
}
@OneToOne(cascadeStrategy=PersistStrategy.class)If the programmer wanted to declare a relationship through which the update-only entity combination strategy would be propagated to an associated entity, he/she would do it as follows:
public Address getAddress() {
return address;
}
@OneToOne(cascadeStrategy=UpdateOnlyStrategy.class)Some generalization should be also done in generating SQL command. Considering that the persist and merge strategies result in generating INSERT or UPDATE SQL command, there should be also some mechanism that would allow a custom strategy to generate its own SQL commands.
public Address getAddress() {
return address;
}
Monday, April 12, 2010
A Gadget for Determining Transaction Attributes for EJB methods
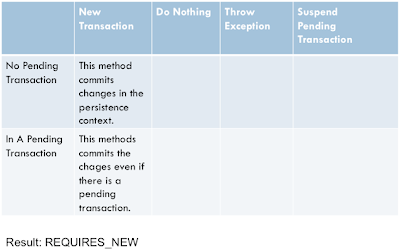
I personally prefer to assign a correct attribute in the two-step scenario: in each step I ask myself what I want the EJB container to do when the method is about to be invoked 1) if there is no pending transaction and 2) if there is a pending transaction. I have to choose one answer from the four options:
- Create a new transaction
- Nothing
- Throw an exception
- Suspend any pending transaction (makes sense in the second step only)
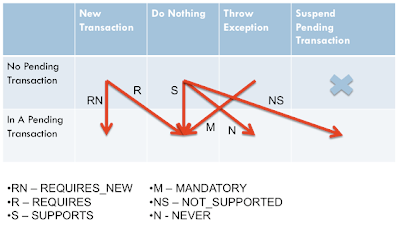
The rows in the table represent the two situations (i.e. no transaction and a pending transaction). The columns indicate the possible answers and a cell corresponds to the selected answer. There are six red arrows in the table that join all feasible answers in both situations. Each arrow is accompanied by an attribute’s acronym. Once I have answered the both questions I simply select the arrow connecting the cells and that’s it.
The table can be also useful as a part of the documentation. A cell may contain an explanations and rationale for choosing it as shown in the following example:
Yet, the table can become a part of the method’s JavaDoc. For example:
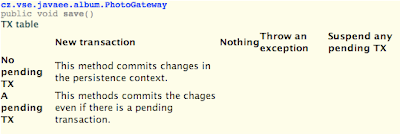
<h2>TX table</h2>
<table>
<tr>
<td></td>
<td><b>New transaction</b></td>
<td><b>Nothing</b></td>
<td><b>Throw an exception</b></td>
<td><b>Suspend any pending TX</b></td>
</tr>
<tr>
<td><b>No pending TX</b></td>
<td>This method commits changes in the persistent context.</td>
<td></td>
<td></td>
<td></td>
</tr>
<tr>
<td><b>A pending TX</b></td>
<td>This methods commits the chages even if there is a pending transaction.</td>
<td></td>
<td></td>
<td></td>
</tr>
</table>
Friday, February 26, 2010
Sending email via Glassfish v3
The programmer's task
From the programmer's standpoint Java EE 5 makes sending emails very easy. In the component's class responsible for sending emails (eg. a servlet or an EJB bean) he/she declares a field of
javax.mail.Session class and annotates it with javax.annotations.Resource annotation. The name attribute of this annotation holds the name of the Java Mail resource defined and configured on the application server. During the component's initialization the container performs the dependency injection which includes an inspection of all fields annotated with this annotation. Once it stumbles upon such a field it reads the name attribute and tries to find a corresponding resource. If it succeeds it injects the resource to the field. If the lookup fails the container raises an exception and prevents the component from being used.
     @Resource(name = "mail/myMailSession")
     private Session mailSession;
The code that constructs, initializes and sends an email message can look as follows:
     // Create the message object
     Message message = new MimeMessage(mailSession);

     // Adjust the recipients. Here we have only one
     // recipient. The recipient's address must be
     // an object of the InternetAddress class.
     message.setRecipients(Message.RecipientType.TO,
                    InternetAddress.parse(to, false));

     // Set the message's subject
     message.setSubject(subject);

     // Insert the message's body
     message.setText(msg);

     // This is not mandatory, however, it is a good
     // practice to indicate the software which
     // constructed the message.
     message.setHeader("X-Mailer", "My Mailer");

     // Adjust the date of sending the message
     Date timeStamp = new Date();
     message.setSentDate(timeStamp);

     // Use the 'send' static method of the Transport
     // class to send the message
     Transport.send(message);
The administrator's task
Once the code is compiled and packaged to the war or ear archive it is the time to deploy it on the application server. Before the application is deployed it is necessary to configure all resources required by the application. The Java Mail session is one of these resources. In the following paragraph I'm going to explain the procedure of setting up a Java Mail session which is able to send messages via SSL (Secure Sockets Layer) protocol.
The SSL protocol provides a secure way for exchanging data on the internet including eg. web browsing or electronic mail. In this example I will show how to configure a Java Mail session resource on the Sun Glassfish v3 application server. Its purpose is to forward the emails to an SMTP server over the SSL protocol. I assume that the SMTP server requires authentication.
Note: This type of connection is available for users of Google Mail (Gmail).
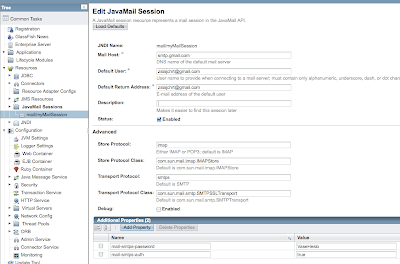
First of all open the Glassfish administration console (eg. http://localhost:4848). Then go to the Resources/JavaMail Sessions section and click on the New button situated above the table in the right panel.
Now enter the name of the JavaMail session that must match the value of the
name attribute in the Resource annotation. In my example the value is mail/myMailSession.The other parameters should be configured as follows:
- Mail Host - the SMTP host, eg. smtp.gmail.com.
- Default User - your user name at Gmail, eg. zslajchrt@gmail.com.
- Default Return Address - the email address used by the application server when the message does not contain the sender's address. In the case of Gmail it matches the default user, eg. zslajchrt@gmail.com.
- Description - the descripton of the session is not mandatory.
- Status - Enabled.
- Store Protocol and Store Protocol Class - leave the values as they are.
- Transport protocol - change it to smtps.
- Transport class - change it to com.sun.mail.smtp.SMTPSSLTransport.
So far you have configured the standard JavaMail session properties. However, the connection you are configuring requires several additional properties to be specified. These properties are added to the table located right bellow the standard properties. A property is added by clicking on Add Property button in the Additional Properties table.
Add in turn the following properties with their values:
- mail-smtps-auth - it specifies that the connection requires authentication of the client. As the value put here true.
- mail-smtps-password - your password for the account at Gmail.
Now the mail session should be complete and you would be able to deploy and run your application.
