The programmer's task
From the programmer's standpoint Java EE 5 makes sending emails very easy. In the component's class responsible for sending emails (eg. a servlet or an EJB bean) he/she declares a field of
javax.mail.Session class and annotates it with javax.annotations.Resource annotation. The name attribute of this annotation holds the name of the Java Mail resource defined and configured on the application server. During the component's initialization the container performs the dependency injection which includes an inspection of all fields annotated with this annotation. Once it stumbles upon such a field it reads the name attribute and tries to find a corresponding resource. If it succeeds it injects the resource to the field. If the lookup fails the container raises an exception and prevents the component from being used.
     @Resource(name = "mail/myMailSession")
     private Session mailSession;
The code that constructs, initializes and sends an email message can look as follows:
     // Create the message object
     Message message = new MimeMessage(mailSession);

     // Adjust the recipients. Here we have only one
     // recipient. The recipient's address must be
     // an object of the InternetAddress class.
     message.setRecipients(Message.RecipientType.TO,
                    InternetAddress.parse(to, false));

     // Set the message's subject
     message.setSubject(subject);

     // Insert the message's body
     message.setText(msg);

     // This is not mandatory, however, it is a good
     // practice to indicate the software which
     // constructed the message.
     message.setHeader("X-Mailer", "My Mailer");

     // Adjust the date of sending the message
     Date timeStamp = new Date();
     message.setSentDate(timeStamp);

     // Use the 'send' static method of the Transport
     // class to send the message
     Transport.send(message);
The administrator's task
Once the code is compiled and packaged to the war or ear archive it is the time to deploy it on the application server. Before the application is deployed it is necessary to configure all resources required by the application. The Java Mail session is one of these resources. In the following paragraph I'm going to explain the procedure of setting up a Java Mail session which is able to send messages via SSL (Secure Sockets Layer) protocol.
The SSL protocol provides a secure way for exchanging data on the internet including eg. web browsing or electronic mail. In this example I will show how to configure a Java Mail session resource on the Sun Glassfish v3 application server. Its purpose is to forward the emails to an SMTP server over the SSL protocol. I assume that the SMTP server requires authentication.
Note: This type of connection is available for users of Google Mail (Gmail).
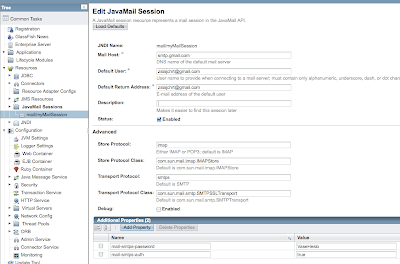
First of all open the Glassfish administration console (eg. http://localhost:4848). Then go to the Resources/JavaMail Sessions section and click on the New button situated above the table in the right panel.
Now enter the name of the JavaMail session that must match the value of the
name attribute in the Resource annotation. In my example the value is mail/myMailSession.The other parameters should be configured as follows:
- Mail Host - the SMTP host, eg. smtp.gmail.com.
- Default User - your user name at Gmail, eg. zslajchrt@gmail.com.
- Default Return Address - the email address used by the application server when the message does not contain the sender's address. In the case of Gmail it matches the default user, eg. zslajchrt@gmail.com.
- Description - the descripton of the session is not mandatory.
- Status - Enabled.
- Store Protocol and Store Protocol Class - leave the values as they are.
- Transport protocol - change it to smtps.
- Transport class - change it to com.sun.mail.smtp.SMTPSSLTransport.
So far you have configured the standard JavaMail session properties. However, the connection you are configuring requires several additional properties to be specified. These properties are added to the table located right bellow the standard properties. A property is added by clicking on Add Property button in the Additional Properties table.
Add in turn the following properties with their values:
- mail-smtps-auth - it specifies that the connection requires authentication of the client. As the value put here true.
- mail-smtps-password - your password for the account at Gmail.
Now the mail session should be complete and you would be able to deploy and run your application.

